Have you ever passed up a piece of cool, vintage furniture because the veneer was chipped or missing?
I found this antique dresser last week and the veneer was in HORRIBLE shape. It was so bad my mom even tried to talk me out of buying it… and she’s pretty convinced I can fix anything 🙂 Broken/missing/chipped veneer doesn’t scare me though because it really is pretty easy to fix; even large patches like this one.
Here is a quick and easy way to fix veneer so that you don’t ever have to pass up on a great piece of furniture again…
 I have to say, in all fairness that I don’t always fix chipped veneer… most of the time I leave it because I love the character it adds to a piece. This veneer however was a whole different story. It had gotten burnt at some point in time and a large patch of it was bubbling up and breaking off.
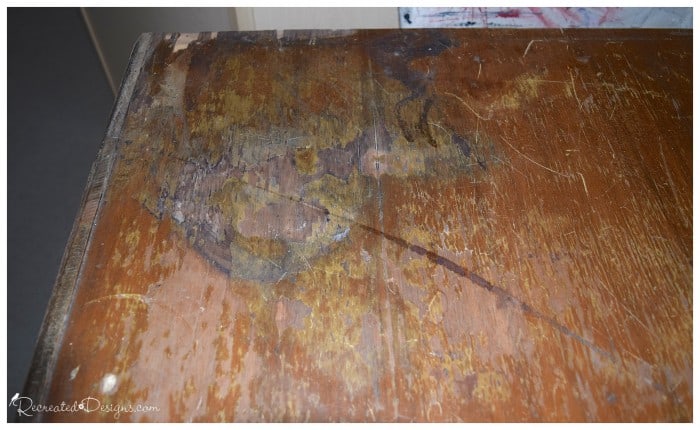 Besides this patch, the rest of the veneer was in pretty good shape (a few chipped pieces here and there) so I didn’t want to peel it all off.
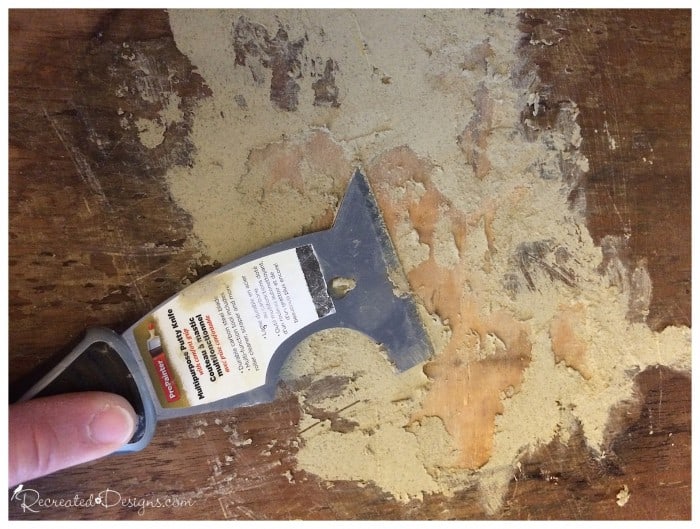
To repair the veneer, I started by chipping off all of the loose pieces. To do this, simply slip a putty knife under the loose pieces and pull up to break them off. Make sure there are no loose pieces or edges left.
 I used Elmer’s ProBond Max for this project but there are lots of great wood fillers out there on the market. Depending on the size of the patch you are repairing, you will need to determine whether you want a courser filler, like this one, or a finer one (the kind used for filling holes).
 This patch was quite large so I knew I would have to fix it in stages to get it all filled in. Always start at the edges and work your way in.
I began by putting clumps of the filler onto the wood and used my fingers to pull it towards the edge of the veneer. By pulling it towards the edge, it will fill in and bond with the existing veneer. This will help to diminish any visible line between the old and new when you are done and helps to keep the filler in place while you are working with it.
 Once I had pulled the filler toward the edge all the way around the hole, I smoothed it out a bit with the putty knife.
 Then to get it even smoother, I used my fingers. Smoothing it out as much as possible at this stage will cut down on the sanding you will have to do when it is dry.
 After it had sat for several hours and was completely dried through, it was as hard as a rock.
 I used a sanding block, working in circles, to sand down the first stage of the wood filler.
 It doesn’t need to be perfectly smooth yet, but sanding it down between applications will allow it to get completely filled in without any gaps.

Using the same wood filler, I then filled in the middle of the patch and smoothed it out as much as possible.
 Once it was dry, I used the fine sanding block again to smooth it out. Be sure to work not only in circles at this stage but also from the centre out. This will ensure a nice smooth surface and no visible breaks between the old veneer and your new handiwork.
  Once you have smoothed it out as much as possible, you will have a beautiful, flat surface that is ready to paint. This process couldn’t be easier and once it is painted you will not even notice where the missing veneer was. Never again will you have to pass up on a piece of furniture because of the shape of its veneer!
Stay tuned in the next couple of weeks as I will be revealing what this dresser looks like after… you won’t believe it’s even the same piece 🙂
Update: Here is the dresser after…
Pin for Later…

**Please note that this post includes affiliate links for your convenience. All links are for products that I have tried and use regularly. By using the link, it in no way increases the cost of the item to you should you choose to purchase. However, by using the link, a small portion of the sale is given back to help fund this blog. Thank you! **


Lisa, I have a veneer kitchen table from my grandparent’s farm. Not crazy about it but love the history. It is faded on top now. What do you recommend for paint?
Sounds like a pretty special table; I’d want to keep it too! For a table top that is veneer I would use Fusion. Rough up the top a little bit with sandpaper and then apply the paint. If you are particularly worried about it adhering, you can also add a layer of their super grip to the table top surface and then the paint. Fusion has a top coat built in so you don’t need to add a top coat but if the table is going to get a lot of use, I would add a top coat of water based Polycrylic. (I like the Minwax one which you can get at Home Depot etc..). Hope that helps and hope you are all doing well <3
Thank you for the tips, Lisa! You are so good at this!
Any time Loralee! and thanks 😉 you are too kind!
Hi, I'm Lisa!
Welcome to Recreated Designs... A place for you to find endless upcycling ideas, unique ways to use vintage finds and oodles of helpful tips and tricks for painting, crafting and recreating. I am so happy you are here and can’t wait to see what you create!
Continue reading about me here!