I am working on recreating another old 80s dresser and wanted some knobs that really added some sparkle to the piece. I usually tend to go with knobs that blend in or melt away all together (like glass ones) but for this piece I really wanted them to stand out and accentuate the beauty of the gorgeous light blue paint. To do this, I came up with the idea of making German Glass Glitter knobs and I have to say, they turned out even better than I could have imagined! I began with two sizes of plain wooden knobs.
Side note: I get most of my knobs from Lee Valley Tools as they have a HUGE selection. I think I may actually be addicted to looking through their knobs online because there are just so many gorgeous ones!  I attached the screws that came with them to each one as it makes them much easier to hold when painting.
  I then painted the sides and the under part of each knob with a narrow, thin brush.
 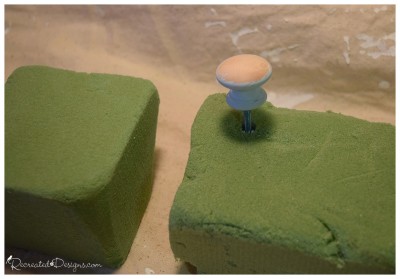 I left the top unpainted so that I could press it into a piece of floral foam. Pushing the screws into the floral foam allowed the paint to dry on all parts of the knob without them being touched.
  Once they were in the floral foam, I painted the tops to each one and then later gave them all a second coat of paint.
  For these knobs, I used Miss Mustard Seed’s German Glass Glitter. If you have never heard of, or used German glass glitter, is literally crushed up glass with silver! It comes from a factory in German that has been producing this glass glitter for over 100 years!! Because it has real silver in it, it will tarnish over time but in my opinion that makes it even more lovely. It is definitely not your ordinary, run-of-the-mill glitter.
  To get the glitter to stick in place, I generously “painted” each knob top with white glue.
  I then dabbed and rolled it into the glass glitter and pushed down to make sure it was all securely stuck in place.
 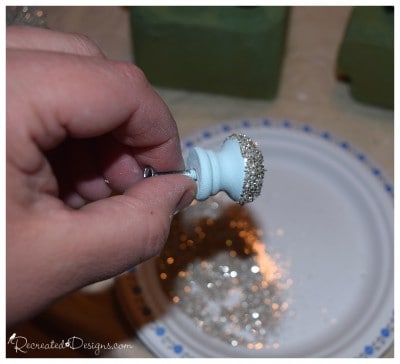 I only wanted the glass glitter to stick to the end/top of the knob so that when you are opening the drawers you can pull on the under side of the knob where the paint is and not on the glitter.
  Once the glitter is in place, I let them dry and then tapped each one to get rid of any loose glitter.
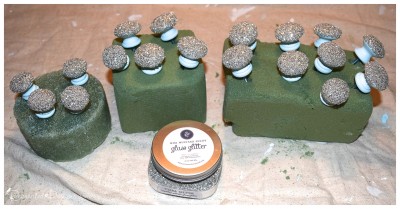
I love how easy and beautifully sparkly these knobs are and can’t wait to show you what they look like on the finish dresser! Stay tuned…
Linked to:
{Chic on a Shoestring} {Have a Daily Cup of Mrs. Olson} {Katherines Corner} {Lamberts Lately}
{Olives & Okra} {The Cottage Market} {The Heathered Nest}

This is such a cute idea, Lisa, I would have never in a million years thought to put german glitter glass on a knob! So clever! Hugs, CoCo
🙂 Sometimes I can’t even believe what I think up. LOL 🙂 They do look gorgeous on the piece though… can’t wait to share the final look!
You have me quite intrigued. I can’t wait to see how you use them.
Thanks for sharing at SYC.
🙂 Pics and a post will be coming soon… it’s almost done 🙂
Very creative way to add bling to knobs. Love the colors you chose.
Isn’t bling wonderful?! 🙂
So interesting! Does the glitter not come off when you use the knob? Visiting from Flaunt It Friday party.
It hasn’t so far 🙂 We’ll see how it holds up over time. It is only on the front of each knob so that you can pull the drawer out without actually having to touch the glitter so that helps and the glue keeps it snuggly in place. It will be a great experiment to see how it holds up 🙂
Hi, I'm Lisa!
Welcome to Recreated Designs... A place for you to find endless upcycling ideas, unique ways to use vintage finds and oodles of helpful tips and tricks for painting, crafting and recreating. I am so happy you are here and can’t wait to see what you create!
Continue reading about me here!