Today, I am so excited to show you the first part of the transformation of my master bedroom. I have collaborated with the incredible Swedish company Photowall for this project and I couldn’t be more thrilled with how beautifully it turned out.
My master bedroom has been on my list of projects to get too for some time and this winter I decided it was now or never. It quite desperately needed to be refreshed and things needed some serious changing up.
Photowall and I decided to team up to transform one of my walls with their gorgeous murals and that’s where the transformation began.
Before
Here is the room and wall behind my bed before. I had added an old screen to the wall above my headboard but then never got around to adding the shutters to either side. Oops. It’s amazing what you let slide when you’re busy. (you can see how to build this headboard here…) The room was boring but cozy enough to keep me happy and never became a priority to work on.
Well… that changed with Photowall. When we decided to collaborate I began pouring through their website. I can’t even begin to tell you how many amazing choices there are! In fact, there are so many that I had my mom pouring through them as well in case she saw something I missed. When I had it narrowed down to about 4 choices, I asked several people to help me pick the final one.
I wanted a mural that had a calming and serene feeling as well as having something to do with nature. I always love bringing the outdoors in and this was no different.
The Mural
Once I selected the mural I wanted, the rest of the process was super easy. I measured the wall it would go on and Photowall did the rest. They sized the mural to my wall measurements and printed it within 48 hours! They were so fast I honestly couldn’t believe it. My mural was on its way from Sweden in the blink of an eye and arrived a couple of days later.
This is what arrived in my kit. The mural all printed into a compact roll and everything I needed to hang it.  I was really impressed with how easy getting the mural ready for hanging was. Photowall had labeled each section and all I needed to do was cut the pieces apart where they said too. It really was foolproof!
  It has been years since I had hung wallpaper and I was a little nervous but it was honestly super easy. My Mom had planned on helping me but since Ontario is in a state of emergency right now with the Pandemic, I had to do it alone.
Hanging the Mural
The hardest part of this project was actually the very first part. (and it wasn’t really that hard!)
It is really important to make sure when you are wallpapering that your first piece is even and level. I started by measuring the width of the wallpaper and then marked my wall the same distance from the corner all the way down. Once I had marked it in about 10 spots, I used a large level to connect them all.
I discovered pretty quickly that despite what it looked like, my wall was not even! Instead of following my marks down the wall, I used the level to keep making a line. It ended up being a little off from about 8 of my markings which meant my wall was not square. My advice… don’t skip this part of you will regret it later!!
With the first piece marked out, I needed to make the paste and get rolling. To hang Photowall murals, you put the paste directly onto the wall and not the paper and I found this so much easier than having it on the paper.
To make the paste, I mixed the powder with some warm water and let it sit for 5 minutes. When it was ready, it looked exactly like the paste we used to use in Kindergarten! Seriously. I just then brushed it onto the wall, about one and a half paper widths at a time, and laid a piece of the mural on top of it. 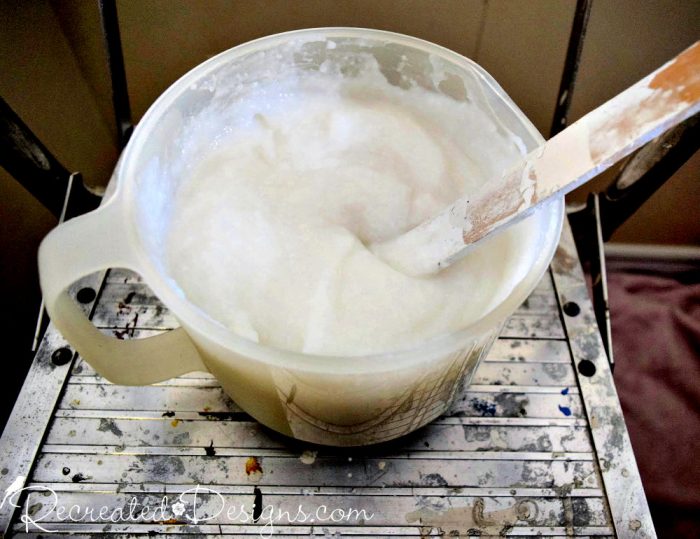 I used the level line I had drawn, not the initial markings, to line up the first piece. After I knew the first one was level, I just had to keep laying the pieces right next to the one beside it and it went really quickly.
 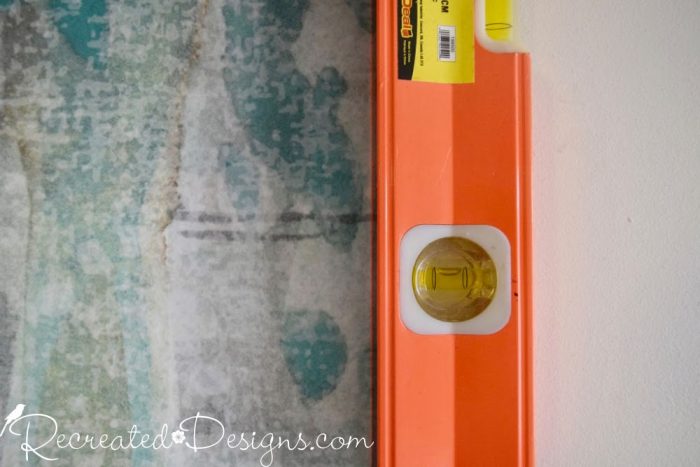 There were a couple of sockets I needed to uncover and it only took a minute to use a straight razor to cut around them while I was smoothing out the paper.
  My kit came with this handy seam roller and it really was useful to have. Each time I added a piece and smoothed it out, I used the tool to flatten the edges together. It was a huge help to get them to lay next to each other and not overlap.
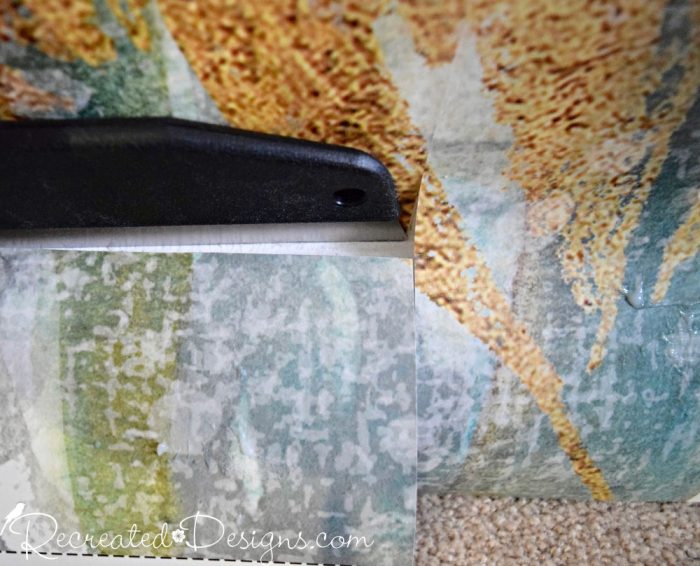
 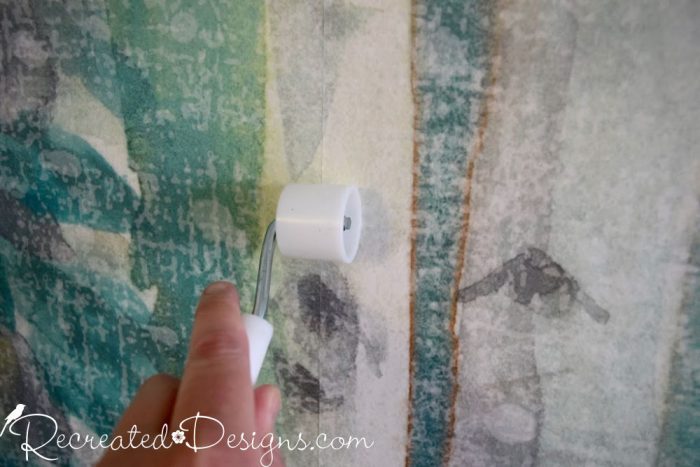 As I worked through the mural I would go about three pieces and then go back and trim off the edges at the top and bottom. You can wait until the end to do this part but I wanted to make sure that the paste didn’t start to dry before I was able to trim and lay each edge flat against the wall.
The Transformation
I really can’t believe what a difference adding this mural made in the room; not only to the look but the feel as well. It gives it the most beautiful feeling of being in a serene birch forest every time I walk in there. Now I just want to stay there all of the time and do my work from the comfort of my bed under the leaves. 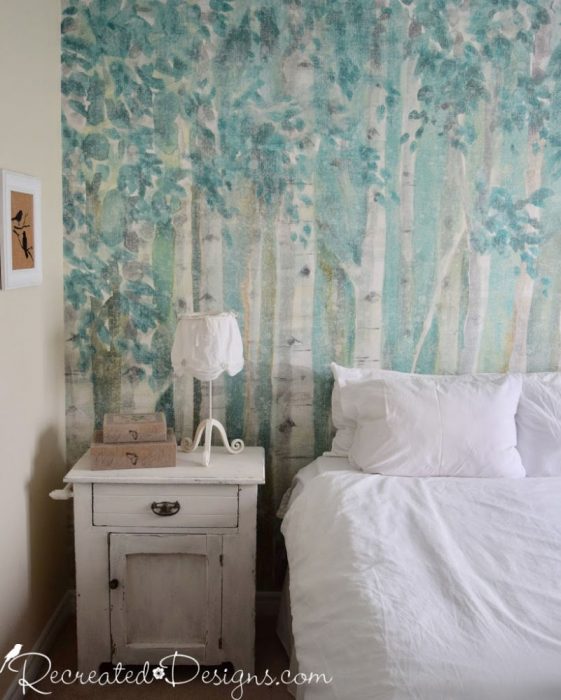
 I want to say a HUGE thank to Photowall for asking me to collaborate. I am still in awe every time I walk into my room at how completely different it looks!
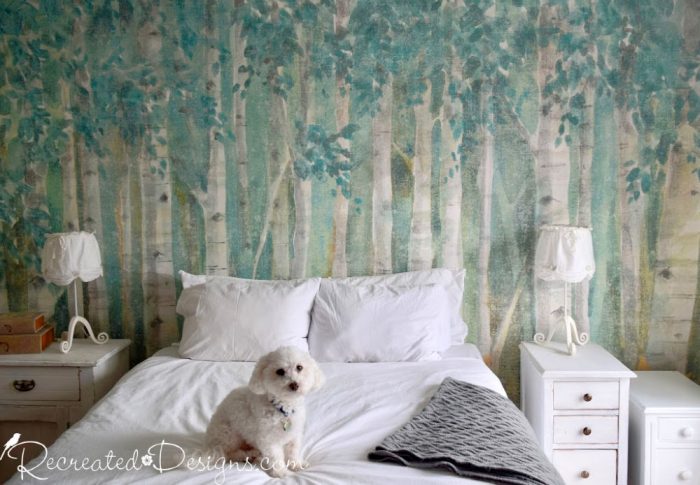
For You
Photowall has been a wonderful company to work with and they have generously offered a 25% discount on their entire site to you all as well! You can use it as much as you want for the next month on any of the gorgeous murals or art pieces on their site. To get your discount, just add recreateddesigns2021 at checkout.
You can find their US site here… and Canadian can use the UK site here…
I would love to know what you have been up to while you’re self-distancing and under isolation/quarantine. It is so important to get your creative juices flowing for so many reasons right now and if you missed last week’s post about creativity during stressful times, you can find it here.
Sending you all virtual hugs!
Stay well my friends ♥

I am so in Love with your choice, I want o copy behind my bed❤️
Thanks so much Bobbie! I have absolutely loved the wallpaper and it makes me happy every time I go into the room!
Absolutely gorgeous. Love your doggy sitting in the trees.
Aww, thanks so much 😉 I’m pretty fond of him too.
Just one word…..OUTSTANDING!!!
🙂 Thanks so much Monique!
I am absolutely in love with your mural. Puppy too! I have tried to find it but have not been successful. I did go to the website shown in your story, but it’s not there. Do you think it is discontinued or maybe available with another seller? Anyway, thank you for sharing your beautiful bedroom.
Aww, thanks so much, Laura! I took a look and the mural I used was Natures Leaves. Here is a link to the US site one… https://www.photowall.com/search?q=Natures+Leaves. I am not sure where you are located. I am in Canada so the UK site is better for me but hope the name helps at least. I have to say that I absolutely love it and every time I walk into the room smile 🙂
I don’t know what is more cute: the wall mural or the dog on your bed!!! Both are lovely….I have never been much for wall paper or murals but this has made me change my mind.
Aww thanks so much, Beverly. I’m pretty fond of him and he wouldn’t move so I ended up giving up and including him in the photos 🙂 LOL. I have never been much for wallpaper with but I could not pass up putting up such a gorgeous mural. I hope that you are well and staying safe!
Simply beautiful Lisa!!!
Thank you so much Louise!
Hi, I'm Lisa!
Welcome to Recreated Designs... A place for you to find endless upcycling ideas, unique ways to use vintage finds and oodles of helpful tips and tricks for painting, crafting and recreating. I am so happy you are here and can’t wait to see what you create!
Continue reading about me here!