Do you have one of these storage cubes or ottomans at home? They have been popular for some time and they are just so handy for storage. I have had this one in my living room for quite a few years and it has taken more than its fair share of use and abuse.
My living room is narrow (and a coffee table feels too overpowering) so I have always used this little cube for everything. Sadly, it has been showing its age for some time though and either needs to be spruced up or given away.
I have toyed with painting it… quite a few times actually. As much as I love paint though, I just don’t think it would have cut it this time. It would have sufficiently covered the damaged areas and looked good from a distance but I really wanted something that would look good up close too.

Recovering the Cube
With paint off of the table, I decided to recover or reupholster the cube. It was very easy and even if you have never recovered anything before, this is a very doable project to start with.
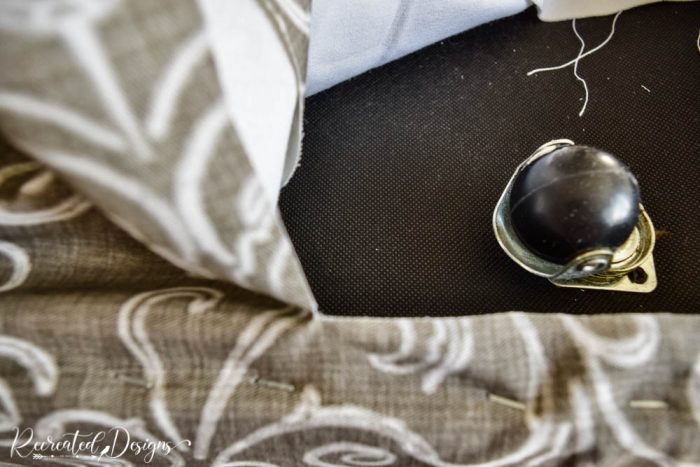
I began by removing the lid from the cube. There were only three pieces of hardware holding the lid in place and were easy to unscrew and remove. Remember to keep your screws with the hardware so that you can replace them when you are done.

With the lid removed, I laid the fabric on my dining room table and then laid the cube ontop. Don’t forget that you want the seam of the fabric (beginning and end) to be at the back so start at the appropriate place to make that happen.
To begin attaching the fabric to the cube, turn the edge of the fabric over the edge of the cube and then secure it in place using a staple gun. Slowly work your way around the cube until you have covered all four sides and you are back to where you began.

Before adding the last couple of staples to the inside lip of the cube, turn the fabric under to create a nice clean seam at the back of the cube. The fabric will stay folded in place because it will be pulled tight from the staples at the top and bottom.

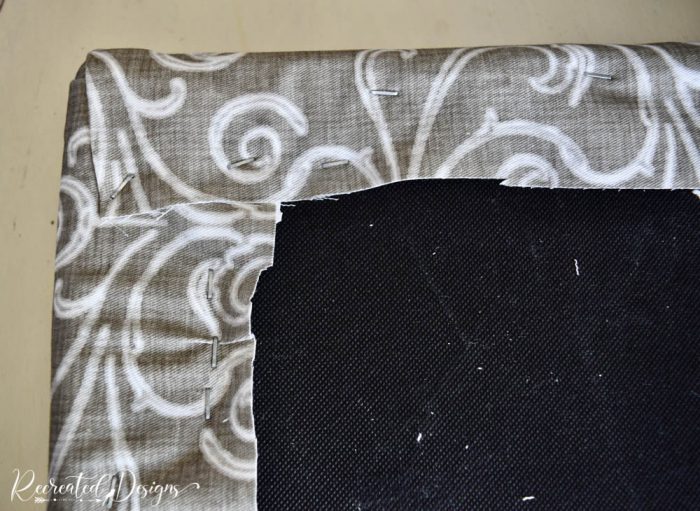
Securing the Bottom
With the fabric attached to the top of the cube, it is easy to secure it to the bottom. Turn the cube onto its top so that you can access the bottom and begin stapling the fabric to the cube frame. Be sure to pull the fabric taught and smooth as you work your way around the square.

If your cube has wheels like mine, trim the fabric so that it doesn’t interfere with them. This can be done once you have worked your way around the entire frame.
Covering the Lid
Covering the lid of the cube is done in the same way you recover a chair seat. You can see specific tips on how to do that here…
The trickiest part of the lid is making your corners all look the same. It doesn’t matter how you decide to fold the fabric over the corners, it just matters that you do the same method on all of them.
With the lid covered, the hardware just needed to be reattached and then it was ready to roll again.

This beautiful fabric completely transformed my handy living room cube and I am completely thrilled that it won out over paint!

Pin for later…


How much material did you use? I’m going to do the same to 2 cubes
Hi Sandy, with every cube being a little different, it will be easiest for you to measure one side of your cube to start. Then times that by 5 for the 4 sides and top. I added on some extra after that so that I had enough to tuck under. I always err on the side of having extra fabric so I have lots to play with 🙂
This looks totally amazing, Lisa! I love the transformation and the fabric you chose is fabulous. It doesn’t even look like the same cube. I love it! Hugs, CoCo
Thanks so much Coco! I am so glad I resisted the urge to paint it and went with the fabric instead 🙂
This came out very nice! I have several ottomans around my home too. They all need something done with them as I’ve had them for years. The 2 newest are more like seats with metal bars underneath. I needed these specifically for the height of them. I couldn’t find what I wanted so I opted for these. I fully intend to make covers for them but haven’t yet as I have many things going on around here that needed done first.
Thanks so much! It certainly is a handy little piece so I have hated the thought of getting rid of it! Your ottomans sound really cool. I don’t think I have seen any like that. Have fun making the covers!
Hi, I'm Lisa!
Welcome to Recreated Designs... A place for you to find endless upcycling ideas, unique ways to use vintage finds and oodles of helpful tips and tricks for painting, crafting and recreating. I am so happy you are here and can’t wait to see what you create!
Continue reading about me here!