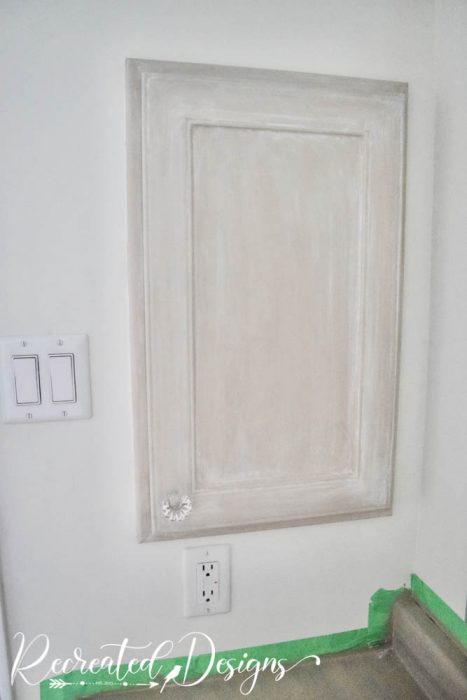
Another week has flown by and this week was all about the cabinets for me in the $100 room makeover challenge. With the walls finished and the room already looking brighter, it was time to lighten up the dark, chocolate brown cabinetry.
If you missed week 1 or week 2 of the challenge, you can pop back and see what the space looked like before and how disconnected it looked from the bedroom.
Prepping the Cabinets
I have to be honest and say that I am not typically a big taper or door remover. I have a very steady hand so I usually save time and just jump right into a project. With these cabinets though, I really wanted to make sure that I was getting super clean lines and not getting anything onto the freshly painted walls soooo… I taped, taped, and taped some more. I also went ahead and removed the doors so that I wouldn’t miss any of the frames.

Cleaning and Sanding
Next to taping, making sure to do the proper prep work is the most important part of this process. To make sure the surfaces were ready for the paint, I cleaned the frames and doors with a tsp alternative and then wiped them down with a wet cloth.
Once they were given a good cleaning, I used very gritty sandpaper and roughed them all up. This step was really about giving a little grit to the surface since laminate is so smooth and slippery.

Milk Paint and Laminate
To paint my cabinets I used Milk Paint by Fusion. I love love, love Milk Paint. It has been around for centuries, is very inexpensive, never goes bad since it comes in powder form, and creates an authentically old look. If you have never used Milk Paint, you can read about it here.
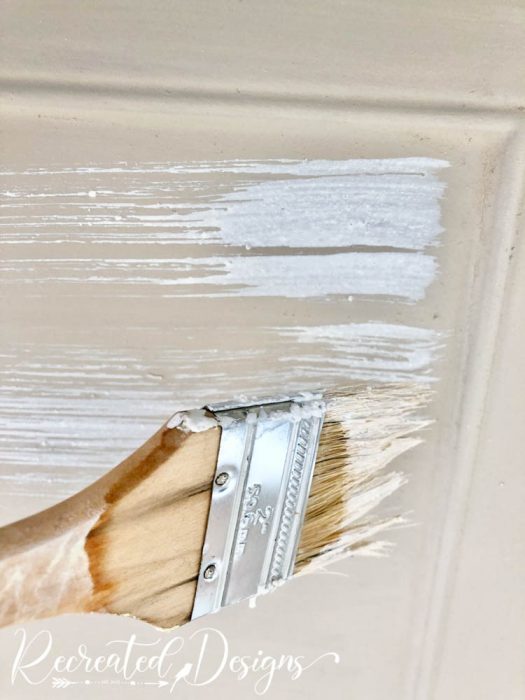
While I typically use Milk Paint on furniture, I wanted to give it a go on laminate. The trick to using it on a slick surface like this is to add a Bonding Agent. The Bonding Agent (or Ultra Grip) is like super glue for paint. I added a very generous portion (almost one to one with the paint) into my first coat of paint and then once I got the mix onto the surfaces, I let it sit for 24 hours to give it time to adhere.
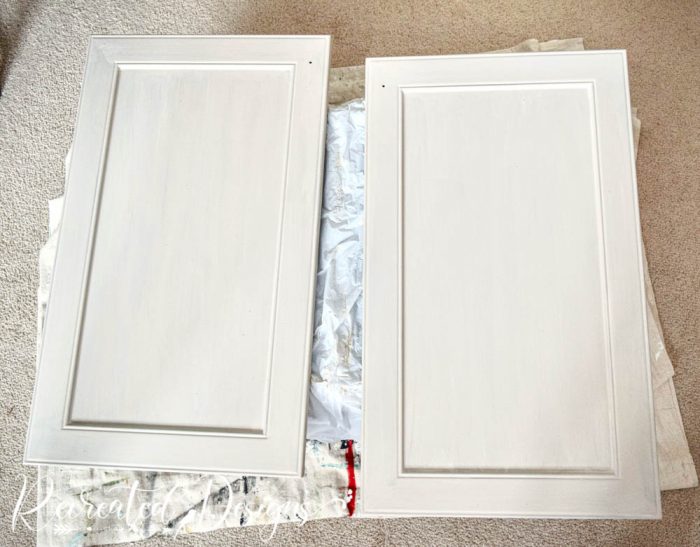
I should add that the colour I used for the base of the cabinets is called Oyster Bar. It is a beautiful, soft beige that doesn’t have any pink hues in it.
Since I had mixed enough of the paint and bonding agent mix for two coats, I repeated the same process for the second coat letting it sit for another 24 hours once I had applied it.
I did end up applying a third coat of paint. The third coat of paint was straight paint, no bonding agent, and was needed because the cabinets had been so dark. You will always need more coats of paint (no matter which brand or type) when you are going from a dark colour to a light one.
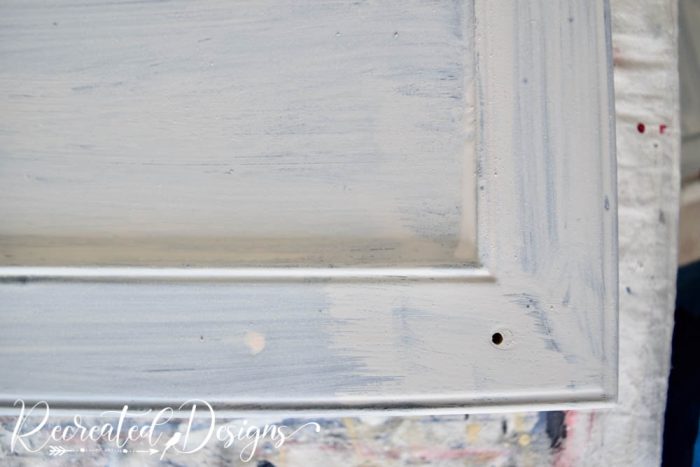
Adding Depth
With the Oyster Bar coloured paint done, I could have left it as is but I wanted to add a little depth and character. I used a pure white colour called Hotel Robe and mixed it 1 part mix to 2 parts water. This created a thinner, waterier paint that was perfect for a whitewash.
The trick to applying a whitewash is to use a Chip brush. An inexpensive Chip brush has very loose natural bristles that are not tight together. When used for painting they will give the paint a loose, woodgrain effect.
You also want to work in small areas at a time. Apply the paint and then use a wet cloth to immediately wipe it down and soften the look.
Sealing the Milk Paint
To finish off the cabinets, the paint needed to be sealed. Milk Paint has no latex or acrylic in it so to protect it, you need to add a sealant. For the cabinets, I used wax to seal the paint. The wax will cure to a hard finish that will protect them from water and marks/chips and it is easy to apply.
I am using this same process on the counter but will seal the paint on that with a poly Tough Coat instead of the wax. I will show you those results next week 🙂
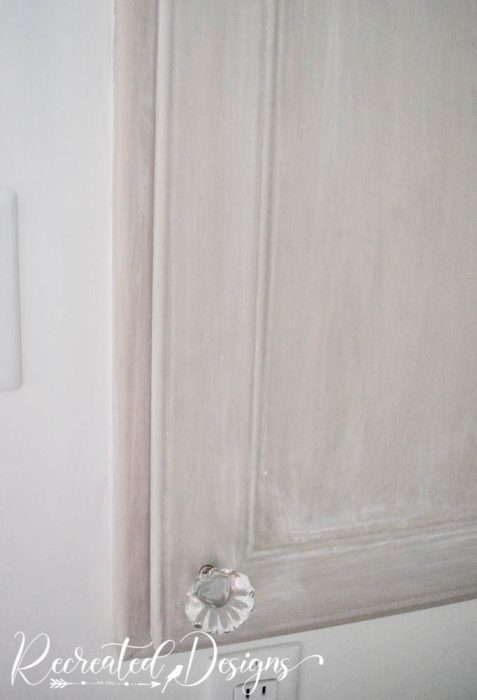
I am absolutely thrilled with how beautifully the Milk Paint worked on the cabinets so far! Lightening up the cabinets has done wonders to the windowless room and I can’t wait to finish it!
My list for the final week…
Finish painting the counter and seal it
Hang the old cabinet that was in my grandparent’s house
Paint the new art for the wall
Decorate the space
Be sure to stop back next week for the final reveal of the room. I am on track to keep the budget under $100 and will give you a breakdown of exactly what the money went towards then.
Also, don’t forget to hop over to visit my lovely blogger friends below and see the amazing rooms they are working on as well!
**Please note that this post includes affiliate links for your convenience. All links are for products that I have tried and use regularly. By using the link, it in no way increases the cost of the item to you should you choose to purchase. However, by using the link, a small portion of the sale is given back to help fund this blog. Thank you and Happy Creating! **


I love how this is coming together!!
Thanks so much! It has been a fun project.
I have never used milk paint before, but I’d love to give it a try. I LOVE Fusion Mineral Paint and I know they just came out with a milk paint line, so I’m excited to figure out what to use it on. Thanks for sharing all your tips! Cannot wait to see this space all finished up!
I love, love, love milk paint. Out of all of the paints I have used and blogged about I always come back to milk paint 🙂 It just has such a beautifully authentic look. I decided to do the room completely with Milk Paint by Fusion (cabinets, counter, and shelf) and it worked amazingly on all. Their new line is great and I continue to be hooked after these projects 😉
Looking good! Excited to see the whole space.
Thanks so much 🙂
Love the paint finish and can not wait to see the full room reveal!
Thanks so much! It has certainly been a fun project 🙂
Just lovely! I really enjoy the paint treatment on the cabinets- it looks vintage and sweet. Looking forward to seeing the room complete.
Thanks so much! It has lightened up the space so much and just feels so much more like me now 🙂
It looks so good. I love the finished cabinets! I am working in a windowless room as well and it makes such a difference to lighten things up!
It is so true! It can be a pretty dark space so transforming the dark cabinets has already made such a difference and it doesn’t seem like such a dark little cave in there 🙂
I have always wondered about the coverage of milk paint on laminate, this looks great! Thanks for such amazing tips!
I have to say that it has worked and adhered really well with the bonding agent. So far, no problems at all thankfully 🙂
This cabinet is totally transformed! It looks like a lot of work, but totally worth it. Can’t wait to see the final result!
It wasn’t too much work it was more the waiting between coats LOL. I couldn’t imagine doing an entire kitchen but for a small bathroom it was pretty quick thankfully 🙂
Hi, I'm Lisa!
Welcome to Recreated Designs... A place for you to find endless upcycling ideas, unique ways to use vintage finds and oodles of helpful tips and tricks for painting, crafting and recreating. I am so happy you are here and can’t wait to see what you create!
Continue reading about me here!